Showing posts with label Embellishments. Show all posts

June 30, 2011

Ocean Colors Palette - A new Journal / Photo Album Cover

I was asked to create a cover for a photo album, sized 8" x 8" square. Instead of using my regular silk sari ribbon style textile art for the cover, I decided to get creative and try something new. In preparation for this project, I had rummaged through all of my fabrics and built up a huge pile of batiks in the "blue/green/teal" colorway. Because I just couldn't choose, I decided to use about 15 of my favorites!
Here is the resulting design:


This journal cover is embellished with tiny shell beads, swavorski crystals, and beaded elastic bands around the spine - plus, a few of my favorite fibers. If you look at a close-up photo of the far right-hand side of the cover, there is a little metal tag which reads "love" nestled among some of my favorite beads:


October 27, 2010

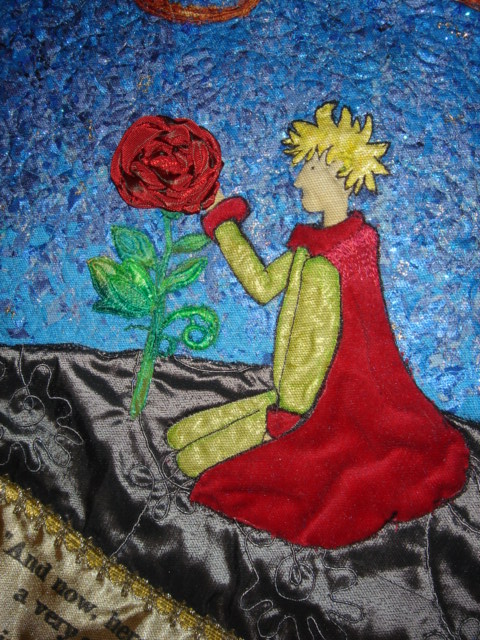
"The Little Prince" Customized Art Quilt

I have been in communication with a new friend via etsy - and all I can say is that it has been SO fun and inspiring!! I was asked to create a special, large wall-hanging style art quilt featuring "The Little Prince" and his Rose, in a similar style to the quilt I had published in Quilting Arts Magazine - except much, much larger! Whimsical images paired with textured fabrics and an "Impressionistic" style background make this piece unique and delightful - reminiscent of the original book's illustrations (the inspiration for this piece).
On this piece I experimented with some new background surface design - building up layers of fibers and stitching mixed with Shiva paintsticks and hand-stitching. The combination of even machine stitching against the scattered, uneven hand stitching creates even more surface interest than in some of my previous pieces.
I also played with some hand-dyed lace, used as appliqued leaves for the Rose - which is also extra-special, created from special silk ribbon in variegated reds using ribbon-embroidery (classic spider-web rose).
I pulled out "all the stops" on this piece, because I knew it would be a treasured keepsake - a very special gift - and I wanted it to be worthy of the occasion it commemorates for its new owner.
In the photos you'll see so many different techniques - those mentioned above, plus many more embellishment and surface design and art quilting techniques - this was truly one of those pieces for me that was difficult to stop - as I realllly enjoyed this theme and the creative freedom I was given - this is truly "my style" art quilting : )


Finished piece measures aprox 30" wide:


The Little Prince is tending to his Rose....


Ribbon-Embroidered Rose with hand-dyed lace leaf applqiues:


"Falling Star" - Fairy Frost Fabric appliqued and surface-embellished with Shiva Paintstiks, with trailing tendrils of metallic mesh - outline stitched by machine and by hand,
with hand-sewn twisted gold bugle beads:


Left:  Extensive overstitching on sunrays, in variegated threads, then overpainted with fabric dye.
Right:  "Orbits" and background planets created using fussy-cut swirly motifs from Van Gogh's "Starry Nights" commercially printed cotton fabric (purchased at Field's Fabrics!):


"Impressionistic" style background in variegated blues created
a perfect "Celestial" background for this "Little Prince" planet scene:


~ Thank you for veiwing my latest project!! ~

August 2, 2010

I was published! August/September 2010 Quilting Arts Challenge - "How Entertaining!"

I was delighted to receive my very own copy of August/September 2010 Quilting Arts in the mail today, along with a letter from Pokey. I'm absolutely thrilled to have one of my pieces published in the magazine!! It has been a long-time dream for me, and I'm especially happy that my first piece was a very sentimental one in honor of my grandmother's 80th birthday. I look forward to having my Poppies piece published as well! : )

I am posting a photograph of the cover of this magazine, along with a link of where to purchase it.

Here is the front cover (beautiful art quilt on the front!!):


Please visit Interweave's Store to purchase this issue of Quilting Arts - it is a *wonderful* magazine!!

Here is another picture of the quilt I had published in this magazine - please visit My Previous Post to read the full description on my blog of how I went about choosing this theme (The Little Prince) and how I went about making this quilt.


I am offering replicas of this quilt (the original is a gift to my grandmother for her 80th birthday) and custom-made art quilts (choose your theme or quote!) on etsy in my store. 

Feel free to stop by and have a look!

Here is the link:   "heathers3stars" etsy store page

~~~~~~~~~~~

Thank you so much for visiting - I appreciate your comments very much! : )


July 12, 2010

Silk Sari Ribbon Pillow - Custom Etsy Order

I met another wonderful person on etsy, who had the vision of using my silk sari ribbon pillow in a new and challenging way - and I'm so pleased with how it turned out! She had purchased new linens for a bedroom in royal blue, and wanted me to use only aquas/blues/purples for the ribbons, keeping the black background.
This wasn't quite the challenge - as these are my favorite colors as well! : )
The challenge was to create a *round* pillow instead of square - and I love how it turned out, so much that I might have to make one for myself!! I'm so happy she had the creativity to envision this pillow with only those colors being used, and round instead of square - not everyone can look at a photo of something and imagine it as something else entirely!! It was very inspiring.

Here is a shot of the pillow which she looked at originally,
or the "before" shot (which is also in another post on my blog):


Now, here are the photographs of the pillow I created, using her ideas!

(Please note: I have difficulty with my camera (or perhaps it is my monitor which has poor color quality), capturing the aquals/teals in any piece I photograph. To me, in person, this pillow has many more aquas and teals...I hope it is visible on other monitors, as I didn't play with the color balance on these photos at all like I usually do.)


This is created using high quality black cotton as the background, which I layered on top of fusible interfacing to help give the front side some shaping for its final form, as well as some sturdiness for sewing on layers of the silk sari ribbon. I had a lot of fun going through all of my skeins of silk sari ribbon to find all of the aquas/blues/purples - and I *love* how they look all layered together!! We opted for no trim, because I felt it would only detract from the design - it is already very textured and layered - a piece of textile art!


I did quite a bit of additional embellishment with hand-beading, and created a center of layered fibers sewn in swirls around the center, with some purple raw silk ribbon cut into a circle and layered for the centerpiece background. I tried using several different large beautiful buttons for the center - I even tried silk flowers, flowers I created with ribbons, layered fabrics, beading, etc - the center was a very tough decision!  I eventually rummaged through all of my embellishments, and found the perfect piece of "bling" - a vintage jewelry piece that was in the shape of a flower, with the beautiful royal blue stones - which would match the color of her bedspread - perfect, if I do say so myself!! : )


Soon I will be posting another pillow similar to this one, except this time square - I'm excited to see how the two pillows will look side by side. I'm sure it's going to be gorgeous!

May 2, 2010

More things that make me happy!

You know that Silk Sari Ribbon that I keep talking about? I *really* do love it!!
Here is a little peek at the window in my art room - I like to iron out the pieces of ribbon and hang them on the blinds (they were white and boring anyway!) - then I can just reach and grab them anytime I please!
I love having a rainbow of color in the window...some people might think of it as being "messy" but I believe it is pure inspiration! It's especially beautiful when the light shines through the window - the ribbon becomes just illuminated with color.


March 24, 2010

Tutorial - Encaustic Wallpaper Medallions

So tonight I was experimenting with melting crayons together, to make new, random-color crayons (in an effort to help myself use more colors that I never use). I didn't quite get as far as making the actual crayons for myself, but I *did* have a heck of a lot of fun making "Encaustic Wallpaper Medallions."

I have long admired the look of the "encaustic" pieces, wonderful paintings with melted layers of beeswax - however I don't have all of the equipment that goes along with that type of artwork, so here is a low-cost, very easy, and super fun method of creating wonderfully sophisticated and artsy-looking pieces.

Here are the instructions:

You will need:
  • Electric Griddle (Check your local thrift store if you don't already have one! It's good to have one dedicated to crafting.)
  • Vintage (or new) deeply embossed wallpaper, NOT prepasted, white or off-white (I have some for sale at http://www.etsy.com/view_listing.php?listing_id=42406479 in my etsy store.) You want the designs to have a nice frame within them, or border, and you'll want the designs to be embossed deeply enough so that it acts as a reservoir for the melted wax.
  • Twinkling H2O's or Pearl-Ex watercolor paints (optional)
  • aluminum foil or non-stick craft sheet
  • Crayons - LOTS of them, with the wrappers peeled off
  • Old paint brush
  • Tongs, or something to hold the paper in place as you work on it, and to lift it off the griddle with when you are finished

Directions:
  • Cut out sections of vintage wallpaper to paint. My wallpaper has both circle medallions and squares, so I cut out a few of each.
  • Optional - Paint your wallpaper with Twinkling H2O's or Pearl Ex watercolor paint - using however many colors you'd like. This makes a shiny, sparkling, yet translucent layer of color, which is nice in areas that show through where any wax isn't applied. Allow to dry thoroughly.
  • Set up your electric griddle in an area where there is circulation, either on a deck or on the stove where you can turn on the fan directly above the griddle (to prevent breathing fumes).
  • Pre-heat electric griddle to about 260 degrees.
  • Line your worksurface on the griddle with a non-stick craft sheet, or a large piece of aluminum foil.
  • Place your piece on the lined griddle, and allow it to heat up for a few seconds.
  • Select a few colors of crayons for the piece you will be working on, and organize them from light to medium to dark.
  • With the lightest colors, begin coloring on your medallion with crayons (it helps to have the wrappers already peeled off), filling in background areas. Gently push against your piece with the crayon, and you will see the wax melt down onto your piece - after some practicing, you'll get the hang of how quickly to move your crayons around and still allow nice layers of colored wax to form. Don't worry about any imperfections - they add to the charm! And resist the urge to "fix" any lumpy or unfilled spots with your fingers - it will be hot!! Remove from heat, and turn down temperature setting on griddle if you see any smoking of the wax or your wallpaper. This means the temperature is TOO HOT for the wax - just turn down, allow to cool for a little bit, then try again.
  • You'll notice the wax will melt and spread out on your piece, filling in the flat bottom (embossed) areas of the design with a thin, liquid wax. Apply more color to fill in all of the flat areas, or purposefully leave some of this "white space" - if you painted beforehand with Twinkling H2Os or Pearl Ex watercolor paints, these painted areas can show through and add a really neat dimensional effect.
  • With the medium colors, start outlining embossed shapes. Go around them, right on top of the lightest colors, close to the shapes. The shapes that are raised will work like a template, allowing you to quickly trace around them. Allow the colors to mix and swirl together in places, and in spots hold the crayon down in one spot for a couple of seconds to "pool" the wax in areas and spill into the background areas.
  • With the darkest colors, hold the crayons sideways above the piece, using tongs or tweezers if needed, and rub the crayon horizontally down across the piece - as if you were making a crayon rubbing. This allows the very tops of the raised images to touch the crayon, and draw the wax down on top of them, without interfering with the color you've already applied in the previous steps.
  • Add more color in areas, or add accent colors wherever you feel it is appropriate - I found myself going around shapes 2-3 times and coloring over the raised images again and again - it can be addicting!!
  • My FAVORITE last step is to use one of the metallics, gold/copper/silver, and highlight various areas of the design. You could also use white or black for this.
  • Keeping the piece as flat as possible, remove from heat and set on a solid surface covered with a non-stick craft sheet to dry (deli paper would work as well).
  • Watch as your piece cools - the wax will become a little more opaque and solid before your very eyes!!
For the more adventerous - you could sprinkle some embossing powders, mica flakes, pearl-ex, or mini-beads into the wax as you work - these would all make really neat effects as well.

Once you have allowed your piece to cool, you can do SO MANY cool things with it. Add stitching, add additional layers of color, cut out sections, piece them together, attach to cards, journals, ATCs, decos, art quilts.... show me what you make!! I'd LOVE to see what you create!! : )


Here are a few photos of my own medallions, ready for further embellishing:


Please contact me with any questions! ; )

March 17, 2010

Art Cards using leftovers from Silk Sari Ribbon Pillow

Today I also had a little look on etsy and saw some fabulous handmade greeting cards, of all sorts - the very "scrapbook-y" style, the handmade cross stitch style, the printed style, some with calligraphy, and some very very artsy - I was inspired to create a couple of my own, using leftover pieces of the center panel of the art pillow (previous post) - the only problem was, how do I complement these silk ribbon panels with ANYTHING that doesn't TAKE AWAY from the beauty of just the ribbon? I think I auditioned every color of every little thing I have in my entire art room that could've fit onto a card (that is a LOT of things...) and nothing seemed quite right. So I tried a couple of hand-painted backgrounds, but it really just looked better on plain white. So I only added simple stamped text...for now. But the ideas are flowing : )


One of the handpainted backgrounds for these cards ended up turning itself into this card:


I love cards because they are small, quick projects that can definitely help you use up leftover pieces and scraps, try new techniques, and hey...you ALWAYS need to have some cards on hand!! : )

Silk Sari Ribbon Pillow

Today I finished up a little project using more of my WONDERFUL silk sari ribbon - ( get it at http://www.etsy.com/shop/NorthcottWilson) - delightful stuff!!

This is a black cotton broadcloth base with a squared center panel of rows and rows of layered silk sari ribbons machine-stitched and then quilted into the pillow. The edges of the square are trimmed out in more silk sari ribbon combined with fancy fibers, twisted and couched down with zig-zag stitching.

I love the "painterly" effect that this ribbon gives!!


I put this one on my own etsy shop:  http://www.etsy.com/shop/heathers3stars

Next time I want to make this same pillow, but with beading in addition to the center panel, plus some silk ribbon rosettes, and loopy fringe - if anybody out there has any ideas on how to create my own loopy fringe, let me know! : )

March 10, 2010

Art Quilt Finished! Hail vintage jewelry!!!

This is the art quilt I was working on  in an earlier post, where I explained how to make "confetti fabric."
I topped it off with some vintage jewelry pieces, layered burned-edge tulle, and added some more hand-stitching and a sleeve for hanging.
Vintage jewelry makes EVERYTHING better...it's the perfect final touch that makes the piece sparkle - I just have to make sure I don't choose pieces that overpower the rest of the design. Well, unless I want that look. You know, a LOT of "bling."  My daughter says "bling, bling on everything!!" as she decorates her digital camera with rhinestone stickers. Vintage jewelry pieces are just "big girl" rhinestone stickers. ; )

Voila! C'est fini.


Now, as for showing the BACK side of the quilt....that feels to me a lot like being walked in on in the dressing room. BUT - I did do a lot of wonderful quilting that I ended up just covering up, so I guess that would be the only place to see it now!! (I'll just close my eyes and hit "upload" and it will all be over!)

I *am* however, going to make the image smaller. That would be like being walked in on in the dressing room, except you haven't actually started changing yet. !!


March 9, 2010

Anthropologie Statement Bib Necklace with Silk Ribbon Flowers

I have been inspired by the "Anthropologie" style necklaces, AKA "Bib Necklaces" or "Statement Necklaces" as I've been browsing around on etsy. So I decided to try making my own! It turned out pretty OK for a first attempt - I heart it so much I could barely stand to list it! ; ) I'll post a tutorial soon.


The flowers are made from 100% silk sari ribbon - which I'm completely obsessed with - all except the center flower, which is a layered style flower made from all different types of fabrics stacked on top of each other. The center flower also has a miniature antique/vintage pearl brooch sewn on - I love upcycling vintage jewelry. The necklace portion is made from two different old necklaces that I pieced together and hand-stitched down onto the "bib" portion, so it has a double-strand effect.

Very fun! Very easy! Make one!! (for yourself!)

Find the Silk Sari Ribbon here:  http://www.etsy.com/shop/NorthcottWilson

Find the necklace at my etsy shop, or something else crafty I've made, here:   http://www.etsy.com/shop/heathers3stars

February 9, 2010

Painted Metal Embellishments

A few days ago while I was having a "paint a bunch of paper" marathon session, I glanced over and spotted some junk metal that I decided to try painting on with my leftover paint. (Do you notice how when you begin painting things, you never really finish?)

These were all metal junk jewelry or scrapbook elements, which I painted with nail polish, then splashed on some regular old acrylic paint. I think next I might dip them in UTEE and sprinkle on some mica pigments? Anyway, I like where this is going!! And a great way to use leftover paint!!