June 30, 2011

Ocean Colors Palette - A new Journal / Photo Album Cover

I was asked to create a cover for a photo album, sized 8" x 8" square. Instead of using my regular silk sari ribbon style textile art for the cover, I decided to get creative and try something new. In preparation for this project, I had rummaged through all of my fabrics and built up a huge pile of batiks in the "blue/green/teal" colorway. Because I just couldn't choose, I decided to use about 15 of my favorites!
Here is the resulting design:


This journal cover is embellished with tiny shell beads, swavorski crystals, and beaded elastic bands around the spine - plus, a few of my favorite fibers. If you look at a close-up photo of the far right-hand side of the cover, there is a little metal tag which reads "love" nestled among some of my favorite beads:


June 16, 2011

Art Quilt: "French Country Cottage Window Box"

This is a new art quilt for my friend Linda in Australia. She requested a quilt to hang in her guest bedroom, which is decorated in stylish black and red with scrollwork linens and "French" accessories. When she mentioned that she'd love it to have a "French" feel, I knew this was a project I'd love to work on! I've always been drawn to the language and imagery of France, for both its natural beauty and the connection it has to my own heritage. Linda helped push me artistically with this piece, encouraging me to try a new style and feel, and to use an image which featured an angled background. I hadn't incorporated any architectural elements into my landscape quilts before this piece, and it was a delightful challenge! It is always a GOOD thing to try new things and expand my repertoire of fiber art skills : )


"French Country Cottage Window"
Imagery selected by: Linda Ellis
Constructed & Quilted by: Heather J. Reid
June, 2011


The finished piece measures 31" tall by 27" wide, and features a "French Country Cottage Window" filled with red flowers and trailing foliage. Fussy-cut leaves, flowers, and birds, all cut individually from commercially printed fabrics, are layered to create the scene. I selected Stonehenge "Cement" for the background wall, as it seemed perfect for the pale gray bricks in the background. I also used other Stonehenge fabrics for window, as the texture of these prints reminded me of distressed, peeling paint. Once the composition was complete, I outline stitched every single piece in place, then embellished with additional thread-sketching and decorative embroidery. I particularly loved stitching the little curly green tendrils of the trailing vines! Fabric dye markers and fabric paints were used to add highlights and shadows. Also, I used additional layers of batting to help create a very three-dimensional effect with the window and shutters, so these are raised on the surface of the quilt.

Last, I tried a new construction element - a double border edging. I read some tutorials and looked at several books to learn how to create this type of edging, and it wasn't nearly as difficult as I would have thought! I guess the words "Mitered Corners" sound more scary than they really are! : ) The effect it gives is definitely worth the trouble - the ivy overlapping the bottom and side inner borders creates a new level of depth in this piece. I'm very pleased with how it turned out!! : )

Foliage overlaps the bottom inner borders of the quilt, creating new dimension:


Fussy-cut leaves and flowers, all cut out by hand and stitched individually onto the surface of the quilt, then embellished with additional overstitching.
Also, you can see the stippling work on the inner border of the quilt, in variegated thread:


Lantern cut from a black batik, then masked and painted with luminous white fabric paint for a "shimmering" glass effect:


Little feathered friends come to visit the cottage! : )

May 20, 2011

Orange & Yellow "OWL" Composition Book Cover

Last night I completed a little gift for my middle daughter - she LOVES orange and yellow, and she absolutely LOVES anything featuring owls. : ) I know she's going to be thrilled!!


This is a standard composition notebook cover (so it is easily refillable), with five special fabrics - three on the front, the lining, and the pockets which the notebook slips into. I chose some vivid orange and yellow batiks, and decided to feature this sweet multi-colored owl print fabric - it was just too adorable!! : )

It's all tied up with a pretty little satin ribbon with owls printed on it - seemed to be the perfect finishing touch!


A couple of things I did differently from my "usual" quilted notebook covers:
The spine is a fancy fabric trim sewn vertically along the halfway point between the two sides. Makes a nice finished look on the "bound" edge of the notebook when closed. (Just have to have something like this that matches the color of your fabrics!! Mental note...find more wide fabric trims...)

Also - this time instead of wrapping fibers and couching them down, I used some special orange metallic ric-rac, some yellow and gold braided trim, and some very fancy ribbon-embroidered trim along the wavy edges of the fabric seamlines.

I can't wait for my daughter to see this!! : )  I'm making several of these to have personalized gifts on hand, and for listing on etsy - it's really fun to coordinate the fabrics and trims - instant gratification type projects : )

If you'd like a personalized notebook cover featuring YOUR favorite colors, theme, or size of notebook - just contact me at heather3stars@yahoo.com - I'm always happy to help : )

~ Enjoy!! ~


May 19, 2011

Betsy Tacy Tib - Childrens' Books as Inspiration

Art Quilt inspired by "Betsy-Tacy and Tib"
Children's Book by Maud Hart Lovelace

I'm finding more and more that childrens' books offer the BEST inspiration - don't we all have those few special books which hold a huge amount of sentimental value?  We can remember snuggling up with someone we love, spending hours listening and gazing, being captivated and mesmerized by the possibilities of imagination...having different worlds revealed to us with the simple opening of a book - enveloping us more and more with the turn of each page - teaching us morals, culture, history, and so much more... ("Read to your children or grandchildren!!!")

I have recently discovered "Betsy-Tacy and Tib," after receiving a request via etsy to create a custom art quilt featuring an illustration from one of the books in the series. The woman who requested this piece has a particular fondess for these sweet stories. : )  They were published between 1940 and 1955, and were written by Maud Hart Lovelace. They follow the adventures of Betsy Ray (a character based on the author herself) and her friends and family, and they take place in the very late 19th and early 20th centuries. Many of the incidents in the books actually happened to Lovelace, and the other characters are based on the author's actual friends and family. The illustrations in the book are absolutely charming!!

Here is the illustration which my artwork was based on:

I was particularly inspired by this illustration for a couple of reasons. First, because the image of three little girls reminded me of my own three daughters - and second, because I love to include large trees in my "illustrated" type art quilts - somehow trees often make their way into childrens' stories (The Little Prince's Baobab trees, for example) and sometimes are even the *center* of the story...ie "The Giving Tree."

As additional inspiration, the owner of this piece also provided me with a quote she chose from one of the books when she originally asked me to create this piece:

"It was June, and the world smelled of roses.
The sunshine was like powdered gold over the grassy hillside."


Here are some photos of how the project turned out - it was delightful to get to work on!! : )


I chose a frame for this piece that looked both "vintage" and "girly" - and which complements the color of the tree. I left the glass off of the frame, so that the detailed texture can be seen more clearly.

Here is one close-up shot - I added some lace to the bodice of one's dress, and did a lot of overstitching - plus added a few more flowers and ground foliage
than shown in the original illustration.


Here is a closeup shot of the foliage at the bottom of the tree -
it is difficult to tell from the above photos,
but each individual fern was cut out and placed with tweezers!! : )


This piece, measuring only 8" x 10", was created using 35+ different fabrics and fibers, either chopped up or fussy cut - plus at least 15 different colors of thread. It was really fun to get to choose the fabrics for their dresses - I shopped at several places to find some "period" style fabrics, with prints in a small enough scale. I found some "reproduction vintage prints" which I really think added to the overall feel of the scene - I think these prints give it a sense of time. 
(Plus, it was just plain fun for me to get to shop around and pick them out ; )


In researching the Betsy-Tacy books for this piece, I found out that there is an active "Betsy-Tacy Society!"  They were so helpful and gracious, and replied immediately to my questions via email from their website:


~~~~~~~
 
Here is a link to view another Betsy-Tacy quilt, with really awesome work!
by "The Curious Quilter":
 

~~~~~~~

Here is a link to my etsy store, in case someone
would like for me to create a similar piece,
or a piece inspired by a different children's book:

If you're unable to view that link, please feel free to email me at:  heather3stars@yahoo.com

I'm always delighted to create custom items - especially those which will be treasured for sentimental reasons - it's my favorite sort of project to get to work on : )

~ Thank you for looking! ~

May 9, 2011

California Mountain Garden Art Quilt

This last weekend I completed a project I've been working on for MONTHS!
This is a 32" tall x 60" wide piece called "California Mountain Garden Art Quilt."
This piece is based on a photograph of a woman's personal garden - with gorgeous apple trees, ferns, lush foliage and flower gardens - and an amazing stone path trailing through it all. I fell in love with the original photograph, and was so pleased to get to work on a piece of this size - created all in one huge piece!
This qult features a combination of pieced together fabrics, fussy cut commercial print fabrics, and some of my own floral designs printed on fabric - plus "confetti fabric." I built this quilt up in layers by section, and did lots of stitching and overstitching - and used several different fibers for the background trees, plus some Angelia fibers for sparkle and a "sunlit" effect over the entire quilt that is not really captured by these photographs.

Here is one of the original photograph from which I worked - taken by Lynn Shannon of her personal garden. Additional photographs of the garden areas in full bloom were also supplied by Lynn; I superimposed and combined several images to create the final piece.


It was an absolute delight to get to translate her photograph into a huge fiber arts piece - it is my hope that every time she looks at this art quilt, it "feels" like looking at her own garden in full bloom! 
Also - I hope my respect for all of her hard work and artistic vision to create such an amazing garden is conveyed in this art quilt. : )


California Mountain Garden Art Quilt
by Heather J. Reid
32" tall x 60" wide
Original Photography & Inspiration by Lynn Shannon
May, 2011


Ground cover & florals with overstitching:


Pieced together floral fabrics & fussy cut fabrics with quilting and thread painting:


Apple tree with white fussy cut blossoms (all cut individually) with confetti background:


Ground Cover at the base of the Apple Trees - fussy cut ferns:


A snapshot of the back of the quilt on the lower left corner - lots of stitching!!

~ ENJOY!! ~

April 18, 2011

Monet's Waterlillies inspired Art Quilt - version 2

This weekend I finished up a little project - this one was a 10x12.5" art quilt, inspired by Monet's Waterlillies. On this piece I tried a few different things - in preparation for the stitching I'll be doing on a 30x60" art quilt - I wanted to try some different overstitching and cutting techniques to create shapes for flowers and foliage. I think it worked out pretty well - I was getting a little tired of the same old "confetti" quilts with just "squares" - with this piece I created the Lilly pads with cut sections of a really neat sheer textured fabric - cut into oval shapes instead of tiny squares. Also with the "weeping willows" I tried cutting the fabrics in longer sort of elongated tear-drop shapes - it worked out really well!

Also - after taking a class awhile back with Lenore Crawford, I've been trying really hard to focus more on lights and darks in my work - so in this piece I took a "leap of faith" and actually added WHITE to the background with the blues - I was really afraid to do it - I covered it up with blue and then uncovered it again - I'm just not quite used to the extreme contrast - but it turned out really well!! So I also added much darker blues in the bottom section beneath the lillies in the water - I like the depth this gives as well. I think it will take a lot more practice to really blend it the way Lenore does - but I'm starting to get the general idea - and stepping outside my "comfort zone" really seemed to work this time! : )

Here are some photographs to see my newest version of this image - one of my all-time favorite Monet paintings. How can a person NOT be inspired by his work?? : )


The "binding" is just a simple silk sari ribbon "frame" - the vibrant colors in the silk really brings out the colors in the art quilt. This was my mom's idea - brilliant!! : )


Close up of the flowers, and Lily Pads - with overstitching:


Vertical closeup shot - how I cut the fabric into long curved strips for the willow trees, and the use of WHITE for contrast in the background:


PS - One last thng I changed in this version - I've started using more Kreinik threads and "Rainbow Blending filament" vs. just the Angelina Fibers. I unravel a whole mess of these sparkly threads, wad them into a loose ball, then start chopping it apart with scissors or a rotary cutter then sprinkle it on. Since I'm not using the heat properties of Angelina, I thought I'd try to find more - and less expensive ways to get the "sparkle" or "sunlight" effect that the Angelina gives. I used 4 colors of Angelina threads - very sparsely - but I'm also really happy with the variety of sparkling threads vs. only Angelina - also gives it more depth.


Enjoy!! : )

April 1, 2011

FREE DRAWING!!

In honor of warmer weather coming - I'm hosting a fun little drawing for some GOODIES, in hopes of inspiring everyone to include a little more GREEN in their projects : )

Win one of my specialty fiber bundles,
in the colorway "GREEN!"

These fiber bundles are also available in my etsy store (and in MANY different colors!!) at:

This batch of fibers contains 2 generous yards each of 15+ different fibers.


HERE'S HOW TO WIN!!

Create a new project - big or small, featuring the color GREEN!

***Please email your NAME and EMAIL along with ONE (1) photograph of your project to:  heather3stars@yahoo.com

I will post ALL entries on my blog using FIRST NAME and photograph (unless you specify in your email that you would NOT like me to share your project on my blog).  If you'd like additional contact information (such as your etsy store, blog, etc) added, please indicate that as well - I'm happy to post it for you : )

The winner of the drawing will receive notification from me on May 5th, 2011, at which point I'll need the shipping address to send the fibers to.


Be creative - have fun -
think "GREEN" -
and share your photographs with all of us!!


~ GOOD LUCK!! ~


Hydrangea Pillow - version 2

The other day I finished up an art pillow, using the "confetti" technique - this one features hydrangeas which is similar to one I created before, with a new twist: FOLIAGE!!
I decided that hydrangeas really do have leaves, contrary to MOST depictions -
and it was really fun to see the colors come alive when the green was added!

Before: (version 1)


After: (version 2!)


Closeup of one of the leaves:


Also on this version #2, I added a little flower adornment - it features a vintage-style metal and rhinestone bloom-shaped center, with layers of the different fabrics I used in the actual pillow cover - plus, a very special hand-dyed vintage lace piece (variegated greens).

I kind of like the green! That could be because the warmer weather is finally coming - I think I have "Spring Fever!" We just moved to a new house (after living in a 3rd floor apartment for years and years!), and there are baby sprouts of green coming up everywhere in the gardens - I'm so excited to see them popping out of the ground!!  I can't wait to see what kind of plants they really are!! I feel a bit like the "Little Prince" waiting for his rose to be revealed - I'm so lucky to have plants and flowers again - it's great, great fun : )


~~~~~~~~~~~~~~~~~~~~~~~~~

So, my "tip of the day" is:  
Add a little bit of GREEN to your next project!

~~~~~~~~~~~~~~~

February 10, 2011

Mini Fabric Art Collage - "Wildflowers in the Forest"

This past weekend, I got to go to 2 days of classes with Lenore Crawford. It was amazing!!! This was a Christmas present from my mom - (she's the best) - and I learned SO MUCH!! I would encourage EVERYONE to take one of Lenore's classes sometime - here is a link to her website:

I have been very busy working on a large art quilt, which I will post soon - however I wanted to share this little piece I started in Lenore's class, and finished up just today. This technique is so FUN!!


This piece is created from tiny little squares of several different fabrics - all overlapped to create a "forest scene" with wildflowers. There is also a bit of hand painting detail on this piece.


I'm already thinking of ways to adapt this - my head is literally spinning with ideas - I'm inspired and motivated all over again!! Sometimes a little art class is all you need : ) *NEED* I say!!!

I'll be posting more again soon!  In the meantime here are a few more photos of this piece, including some close-ups which show the technique and detail a little more clearly. Enjoy!!!


See? It looks like a bunch of jumbled squares close-up, however from a distance they all blend together into one cohesive piece. It is really interesting to think about fabric prints in this way - almost like putting a puzzle together. And best of all - a whole project can fit into ONE ziploc baggie - I'll be bringing projects like this with me everywhere from now on!! : )

January 14, 2011

Silk Sari Ribbon Owl Pillow

Tonight I finished up a previous project - a little Owl, which I made into a pillow tonight. I made the owl using silk sari ribbon textile art, leftover from creating pillows, along with bits of colorful fabric, vintage lace, and vintage jewelry pieces.
I layered the owl on a broze hand-dyed fabric, trimmed the edges with brown velvety ric-rac style trim, and made an overlapping style back for ease of putting in a pillow form.
I'm really happy with this little pillow! Maybe I should make one for myself!! : )

January 13, 2011

Starter Art Journal Pages

I haven't posted in a long while, as I've been VERY busy with several different projects - one HUGE one which I'm extremely excited about - and several other smaller ones.
It's about time for me to post something new!!

Here are a few things I've done over the past couple of weeks:

First, I created a "Starter Art Journal" for a friend on etsy. She had previously purchased one of my silk sari ribbon album covers, and wanted an "artsy" inside for it as well : ) So - I tore, layered, stitched, ripped, assembled, and even pre-painted a few pages - adding edgings here and there, hidden pockets here and there - it was a pretty fun project, and made me miss my art journaling - I'm inspired to get going on that again for myself now! : )

Here are a few of my favorite pages - I ended up making three separate "books" which were about 10 pages each. I included all sorts of different papers - ephemera, graph paper, maps, brown paper bags, and of course all the specialty papers I can't resist - mulberry, lace paper, handmade papers, textured vellum, transparencies, botanical inclusion paper, etc.

Lots of texture, ripped edges, layered pages, and a "variety pack" of cool papers!


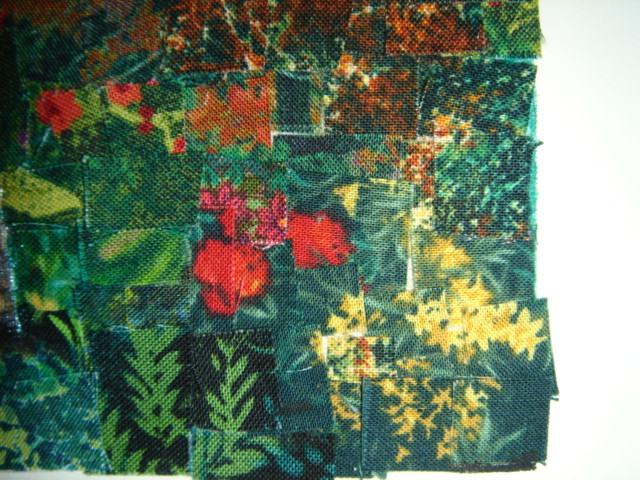
Most of the pages were stitched by machine to create "blocks" - pre-prepared for art journaling - just add paint, stamps, writing, photos, ephemera, calligraphy, embellishments....when do you STOP, really??!


Some of the silk sari ribbon projects I've done lately - pillows, journal covers, and wall pieces - end up with nice little edges that get trimmed off. I love to recycle these onto journal pages - it looks as if I spent hours creating a special border for this page! Really, it's just a "trimming" from a previous project - it's great to NOT waste anything!!


Mmmmmm, handpainted papers - botanical papers...combined with brown craft paper, bits of black, and a sponged edge - ink through sequin waste ribbon creates the dots...woudln't this be a fun journal to begin working in? WAY better than starting with a blank page! : )


Sew around three sides of a commercially printed transparency, and you have an instant "pocket" for photos or other little goodies like love notes, ticket stubs, etc.


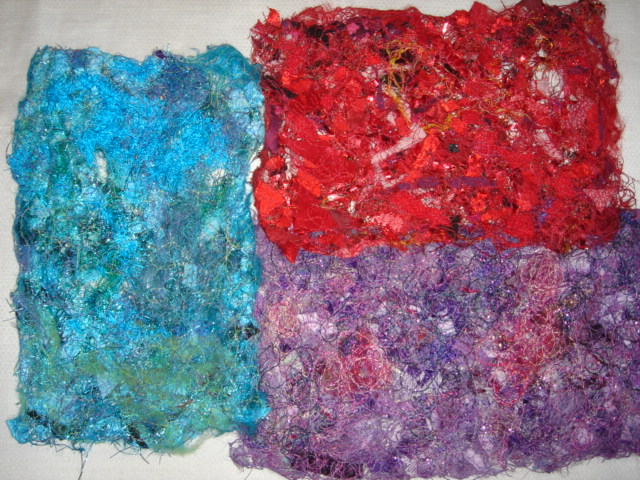
Aside from these little "starter journals" I also made a few more sheets of "Confetti Fabric" - Purple, Red, and Aqua this time. The red piece actually includes pieces of red holiday tinsel - the kind sold in the big packages to use as gift basket fillers. I really liked the festive effect it gave - and I'm considering some Christmas cards next year using more pieces like this! Very sparkly and shiny : ) Maybe even Valentine's Day cards!! Then I'd get to use them much sooner...


(One of my earlier posts shows a step-by-step TUTORIAL on how to make this!)

My last little project to report for today - I finished up a quilted & embellished art journal/calendar cover. This one was to be "Light Blues" - but somehow evolved into an "Ocean" theme - mainly because I bought these adorable fish beads and *needed* to use them on something!! : )  The fish looked a little lonely though - and sort of out of place - so then I gave them a habitat. What was fresh on my mind, but confetti fabric! I've found a new use for it - tear a chunk off and place it at the bottom of a journal cover. Instant glorious underwater scene! I'm really happy with how this turned out! This was a piece of confetti fabric I made a few months ago, featuring aqua, teal, and yellow. I did quite a bit of overstitiching to add more greens and blues to it - to help it blend in with the fabric colors. I've never featured a piece of my own original textile art on the front of one of my journals before - but I think this might end up being a new trend of mine now!


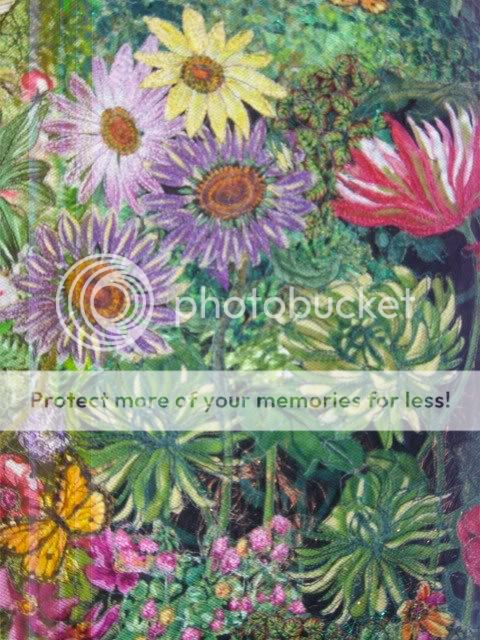
I probably won't be posting much over the next couple of weeks, becuase I'm working on a HUGE 60" wide by 33" tall art quilt, featuring a gorgeous garden in Colorado. I'm just THRILLED about this project - however I will need to focus almost all of my creative energy on it for awhile -
I'll post photos of that project soon!