Showing posts with label Fabric Projects. Show all posts

May 20, 2011

Orange & Yellow "OWL" Composition Book Cover

Last night I completed a little gift for my middle daughter - she LOVES orange and yellow, and she absolutely LOVES anything featuring owls. : ) I know she's going to be thrilled!!


This is a standard composition notebook cover (so it is easily refillable), with five special fabrics - three on the front, the lining, and the pockets which the notebook slips into. I chose some vivid orange and yellow batiks, and decided to feature this sweet multi-colored owl print fabric - it was just too adorable!! : )

It's all tied up with a pretty little satin ribbon with owls printed on it - seemed to be the perfect finishing touch!


A couple of things I did differently from my "usual" quilted notebook covers:
The spine is a fancy fabric trim sewn vertically along the halfway point between the two sides. Makes a nice finished look on the "bound" edge of the notebook when closed. (Just have to have something like this that matches the color of your fabrics!! Mental note...find more wide fabric trims...)

Also - this time instead of wrapping fibers and couching them down, I used some special orange metallic ric-rac, some yellow and gold braided trim, and some very fancy ribbon-embroidered trim along the wavy edges of the fabric seamlines.

I can't wait for my daughter to see this!! : )  I'm making several of these to have personalized gifts on hand, and for listing on etsy - it's really fun to coordinate the fabrics and trims - instant gratification type projects : )

If you'd like a personalized notebook cover featuring YOUR favorite colors, theme, or size of notebook - just contact me at heather3stars@yahoo.com - I'm always happy to help : )

~ Enjoy!! ~


April 1, 2011

Hydrangea Pillow - version 2

The other day I finished up an art pillow, using the "confetti" technique - this one features hydrangeas which is similar to one I created before, with a new twist: FOLIAGE!!
I decided that hydrangeas really do have leaves, contrary to MOST depictions -
and it was really fun to see the colors come alive when the green was added!

Before: (version 1)


After: (version 2!)


Closeup of one of the leaves:


Also on this version #2, I added a little flower adornment - it features a vintage-style metal and rhinestone bloom-shaped center, with layers of the different fabrics I used in the actual pillow cover - plus, a very special hand-dyed vintage lace piece (variegated greens).

I kind of like the green! That could be because the warmer weather is finally coming - I think I have "Spring Fever!" We just moved to a new house (after living in a 3rd floor apartment for years and years!), and there are baby sprouts of green coming up everywhere in the gardens - I'm so excited to see them popping out of the ground!!  I can't wait to see what kind of plants they really are!! I feel a bit like the "Little Prince" waiting for his rose to be revealed - I'm so lucky to have plants and flowers again - it's great, great fun : )


~~~~~~~~~~~~~~~~~~~~~~~~~

So, my "tip of the day" is:  
Add a little bit of GREEN to your next project!

~~~~~~~~~~~~~~~

February 10, 2011

Mini Fabric Art Collage - "Wildflowers in the Forest"

This past weekend, I got to go to 2 days of classes with Lenore Crawford. It was amazing!!! This was a Christmas present from my mom - (she's the best) - and I learned SO MUCH!! I would encourage EVERYONE to take one of Lenore's classes sometime - here is a link to her website:

I have been very busy working on a large art quilt, which I will post soon - however I wanted to share this little piece I started in Lenore's class, and finished up just today. This technique is so FUN!!


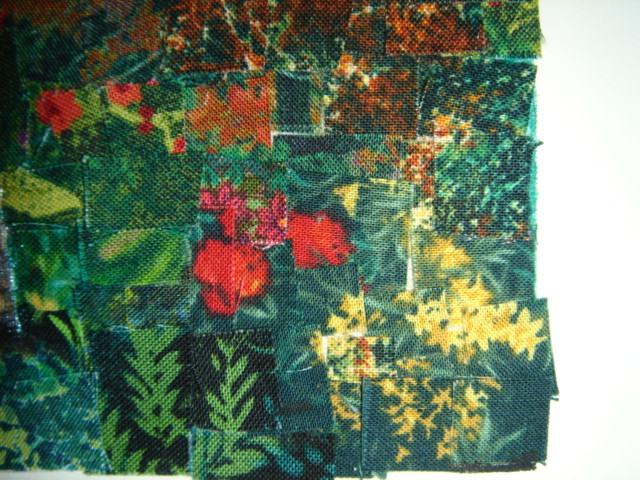
This piece is created from tiny little squares of several different fabrics - all overlapped to create a "forest scene" with wildflowers. There is also a bit of hand painting detail on this piece.


I'm already thinking of ways to adapt this - my head is literally spinning with ideas - I'm inspired and motivated all over again!! Sometimes a little art class is all you need : ) *NEED* I say!!!

I'll be posting more again soon!  In the meantime here are a few more photos of this piece, including some close-ups which show the technique and detail a little more clearly. Enjoy!!!


See? It looks like a bunch of jumbled squares close-up, however from a distance they all blend together into one cohesive piece. It is really interesting to think about fabric prints in this way - almost like putting a puzzle together. And best of all - a whole project can fit into ONE ziploc baggie - I'll be bringing projects like this with me everywhere from now on!! : )

January 14, 2011

Silk Sari Ribbon Owl Pillow

Tonight I finished up a previous project - a little Owl, which I made into a pillow tonight. I made the owl using silk sari ribbon textile art, leftover from creating pillows, along with bits of colorful fabric, vintage lace, and vintage jewelry pieces.
I layered the owl on a broze hand-dyed fabric, trimmed the edges with brown velvety ric-rac style trim, and made an overlapping style back for ease of putting in a pillow form.
I'm really happy with this little pillow! Maybe I should make one for myself!! : )

January 13, 2011

Starter Art Journal Pages

I haven't posted in a long while, as I've been VERY busy with several different projects - one HUGE one which I'm extremely excited about - and several other smaller ones.
It's about time for me to post something new!!

Here are a few things I've done over the past couple of weeks:

First, I created a "Starter Art Journal" for a friend on etsy. She had previously purchased one of my silk sari ribbon album covers, and wanted an "artsy" inside for it as well : ) So - I tore, layered, stitched, ripped, assembled, and even pre-painted a few pages - adding edgings here and there, hidden pockets here and there - it was a pretty fun project, and made me miss my art journaling - I'm inspired to get going on that again for myself now! : )

Here are a few of my favorite pages - I ended up making three separate "books" which were about 10 pages each. I included all sorts of different papers - ephemera, graph paper, maps, brown paper bags, and of course all the specialty papers I can't resist - mulberry, lace paper, handmade papers, textured vellum, transparencies, botanical inclusion paper, etc.

Lots of texture, ripped edges, layered pages, and a "variety pack" of cool papers!


Most of the pages were stitched by machine to create "blocks" - pre-prepared for art journaling - just add paint, stamps, writing, photos, ephemera, calligraphy, embellishments....when do you STOP, really??!


Some of the silk sari ribbon projects I've done lately - pillows, journal covers, and wall pieces - end up with nice little edges that get trimmed off. I love to recycle these onto journal pages - it looks as if I spent hours creating a special border for this page! Really, it's just a "trimming" from a previous project - it's great to NOT waste anything!!


Mmmmmm, handpainted papers - botanical papers...combined with brown craft paper, bits of black, and a sponged edge - ink through sequin waste ribbon creates the dots...woudln't this be a fun journal to begin working in? WAY better than starting with a blank page! : )


Sew around three sides of a commercially printed transparency, and you have an instant "pocket" for photos or other little goodies like love notes, ticket stubs, etc.


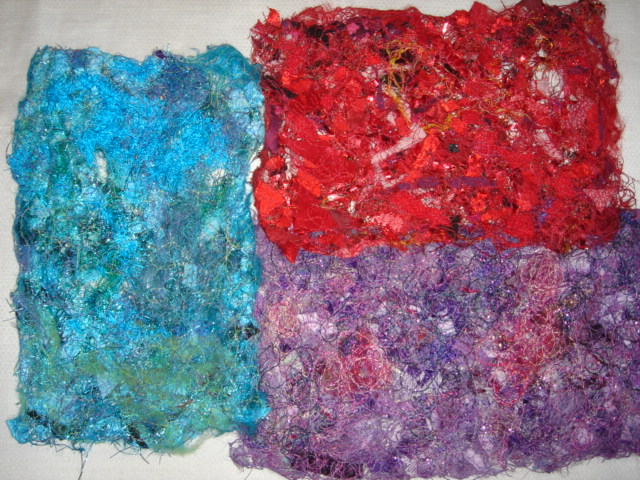
Aside from these little "starter journals" I also made a few more sheets of "Confetti Fabric" - Purple, Red, and Aqua this time. The red piece actually includes pieces of red holiday tinsel - the kind sold in the big packages to use as gift basket fillers. I really liked the festive effect it gave - and I'm considering some Christmas cards next year using more pieces like this! Very sparkly and shiny : ) Maybe even Valentine's Day cards!! Then I'd get to use them much sooner...


(One of my earlier posts shows a step-by-step TUTORIAL on how to make this!)

My last little project to report for today - I finished up a quilted & embellished art journal/calendar cover. This one was to be "Light Blues" - but somehow evolved into an "Ocean" theme - mainly because I bought these adorable fish beads and *needed* to use them on something!! : )  The fish looked a little lonely though - and sort of out of place - so then I gave them a habitat. What was fresh on my mind, but confetti fabric! I've found a new use for it - tear a chunk off and place it at the bottom of a journal cover. Instant glorious underwater scene! I'm really happy with how this turned out! This was a piece of confetti fabric I made a few months ago, featuring aqua, teal, and yellow. I did quite a bit of overstitiching to add more greens and blues to it - to help it blend in with the fabric colors. I've never featured a piece of my own original textile art on the front of one of my journals before - but I think this might end up being a new trend of mine now!


I probably won't be posting much over the next couple of weeks, becuase I'm working on a HUGE 60" wide by 33" tall art quilt, featuring a gorgeous garden in Colorado. I'm just THRILLED about this project - however I will need to focus almost all of my creative energy on it for awhile -
I'll post photos of that project soon!

December 3, 2010

Fabric Art Pillows - "Mrs. Hoot!"

My mom had the cutest idea - creating a little owl art quilt pillow. It began with the fabric which you see on the eyes of this whimsical little owl - she looked at it and said "This fabric would make perfect owl eyes!!" So, she just began free-cutting shapes and fused them together - then added bits of dainty vintage lace, and vintage jewelry pieces - and look how sweet it turned out!!

Mrs. Hoot has dressed herself up for a little party, making her own "Altered Couture" style of vintage clothing - (she's obviously been reading Belle Armoire magazine) - all dressed up in her finest pretties and jewels. Wonder what kind of party she'll attend? : )

This owl pillow features silk sari ribbon textile art remnants (leftover from my art pillows on etsy), bright printed fabrics, vintage lace and jewels, rose-shaped acrylic cabochon eyes, free-motion embroidery, and 3d layering for a really unique little pillow on green damask weave fabric.


This pillow sold the very day I listed it on etsy, so I created another -
this might end up being a very fun series!! : )


Sometimes leftover scraps from old projects make the *best* embellishments for new projects!

~ Enjoy!! ~

November 5, 2010

Purple, Silver & Gold - Sari Ribbon Baby Album

This is a special album cover I created for an etsy order - featuring the layered silk sari ribbons and loopy spine trim. The purchaser wanted this album cover for a 12" x 12" album, for her first baby, and requested purple since she didn't know the gender of the baby yet.
Donna at Field's Fabrics helped me out quite a bit with selecting coordinating fabrics, as I was a little stumped on how to include silver and gold - as I haven't ever really combined the two colors together! She was a huge help to me (I love shopping there!) - and I'm so grateful!!

Here is how it turned out! : )


~ Thank you for looking! ~

October 14, 2010

Wildflowers - Mini Art Quilt

"Wildflowers" is a frameable small art quilt featuring lustrous silk sari ribbon flowers, with batik fabrics for the sky and foliage. A sweet floral scene with variegated overstitching embellishment. It is mounted on heavy white matboard and is titled and signed. Art quilt piece measures 4.5" wide by 6.25" tall, and the matboard measures 8.5" x 11" (standard size).
My mom and I actually collaborated on this piece as well - we had a LOT of fun picking out fabrics and layering the backgrounds!! : ) I'm in the process of making several of these, in different variations. I really love combining all of these little pieces of fabric - it's so fun!! I've started researching different flower types, especially wildflowers, and began a journal to draw outlines of the flowers - repetitively - to help me get the feel for their different shapes. I think this will help a lot when I cut them out - I'd like to be able to say I free-cut them instead of drawing the outlines first. I'm looking for a couple of good books that might have the vintage-style, very simple coloring and outlining, with the common names for various wildflowers - it should be a fun hunt!! A few I'd like to try so far are Coneflowers and Iris (which I'm trying to perfect) - and Lily of the Valley, Aster, Bachelor Buttons, Crocus, and Forget-Me-Not - and maybe some violets. Oh! And Pansies - for my grandmother : )

"Wildflowers" Matted Art Quilt by Heather J. Reid


A close-up view of the flower and stitching detail:


Last, here is a quick snapshot of the back, to see how much stitching there is on this one tiny piece!
(You can see why I use "Bottom Line" thread for the backs of pieces like this!!)

 
This piece is available in my etsy store at:


(If you don't see this piece available anymore for purchase, let me know - I can create something especially for you or reproduce this particular piece.)

~~~~~~~~~~~~~~~~~~~

Try making some mini art quilts for yourself!!
They are super fun - if there is anybody out there who would like to trade with me some batik fabrics or cotton printed fabrics (ones which might be suitable for this kind of scene) - I'm especially short on beiges and ivory...I'd be happy to do a "swap" with you! Just email me (heather3stars@yahoo.com).


September 18, 2010

Color Palette Challenge - Cream, Olive, and Rust

My friend Rosanna asked me to create a special art journal for her friend's birthday. Rosanna already had an art journal I had made using the silk sari ribbon, frayed and sewn in rows in layers with beading - for her friend she wanted something similar but with a completely different color scheme. I gravitate towards bright colors - and a lot of them! - so it was a real creative challenge for me to use a specified set of colors, but it really inspired me to begin thinking more about the colors I don't normally use. The more I worked with this color set, the more I liked it! Plus, it feels very "fall" - and fall is definitely here in Michigan. I'm happy with how this turned out - and I'm already thinking of ways to incorporate these colors into my other pieces - I love the sophisticated effect they have!

I rummaged through my fabrics and supplies, and discovered that I didn't really have very many materials to work with in this color range - I had a LOT of of fun shopping and picking up some fresh new fabrics and beads - here are the supplies I ended up working from. I share these photos because maybe now this color palette will inspire someone else as well! : )


Last but not least, the silk sari ribbons! : )


Here is the finished art journal:

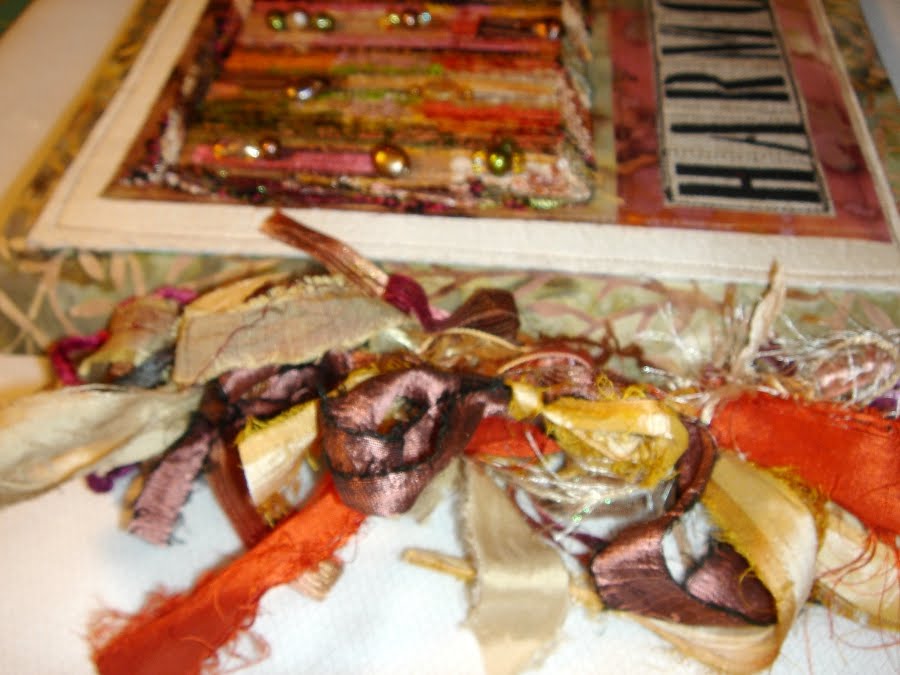
Front Cover - Layered Silk Sari Ribbon stitched in rows, embellished with beading, along with black stamped letters on canvas - all layered onto a colorful batik, then candlelight silk dupioni, and an olive/cream foliage themed batik background.


Ribbons on spine laced through grommets inset in the spine, which not only looks pretty but is functional too as it anchors the inner rings which hold the inside pages.


Close-up view of the silk sari ribbon panel - it was difficult to choose which beads to use, because I love them all! : )


Inside front cover - customized label.


Inside pages - a "variety pack" of special papers, including handmade, vellum, metallic inclusion, botanical inclusion, foiled, stamped, glassine envelopes, and handmade paper.


My art journals are available for custom order at:

~ Embrace the colors of fall! ~

August 21, 2010

Stitched & Quilted Bird - Experiment #1

I am currently working on a very large art quilt - a commisioned piece for a wonderful lady in Australia. This will be another of the "Impressionistic Style" art quilts which I really love to create. She wants a forest type scene, with gorgeous birds, and some other "characters" such as dragonflies, toadstools, happy flowers, and a large swirling tree. This will be an extremely large piece (for me), and will be in the form of a triptych or a series of 3 art quilts which will hang side-by-side. The total width will be around 60" and the height will be around 30", so I will have two smaller rectanges on the sides measuring 17" x 30" and one in the center measuring approximately 22" x 30". It is going to turn out to be absolutely amazing  - my Australian friend has such a gift for creative vision!

So far I have done the prep-work for this quilt - researched for possible images, preparing the large pieces of cotton batting fused to backing fabric (for stability), and marking out a 3" x 3" grid on the batting.
Here is a photograph which shows the batting, on which I have sketched out the initial design for the large swirling tree.


I have altered some of the branches since this photo - making them swirl down more on the center panel to allow for a pair of birds to perch. The birds will be Australian Blue Wrens - which are absolutely beautiful!! I haven't come across any images of these birds that I didn't fall in love with, so choosing just one image was pretty difficult - the most difficult part however, was deciding HOW to create the birds for this quilt. I consulted my stack of art quilting books and magazines - and came across my copy of "Quilting Arts" Issue #34.  (I *love* Quilting Arts Magazine!!! Here is a link to their website:  http://www.quiltingarts.com/ )


In this issue, there is a wonderful article by Karin Winter called "Quilted Pet Portraits" - I decided to try creating a bird from several different layered scraps of fabric combined with thread painting, as her how-to article describes.

Here are my "blues" - fabrics and threads! (You'll see I love to collect fabric and thread!!)


Here are the results of my first try - or "Experiment #1" - I love this style!! : ) You'll see my "inspiration" photograph along with the finished bird. This quilted and stitched bird will be cut out and applied as an applique to the larger art quilt later on - the background fabric showing was only used for stability while stitching, and to serve as a foundation to build up the layers of fabric on during the creation process.


It will look much different when it has been cut out and applied to the planned background scene.


A Close-Up photo of all of the stitching:


This one little bird took about 6 hours of cutting, stitching, layering, and stitching again...and again...and again!! I just kept using different variegated threads, filling in areas and going back over lines - adding texture - it was amazingly fun - I really love this style of art quilting.

This art quilt project is so inspiring - I completely love the colors and the scene, the whimsical style of images my friend selected - it has been a joy to work on so far. : )

I'll be posting more photos of this project soon!