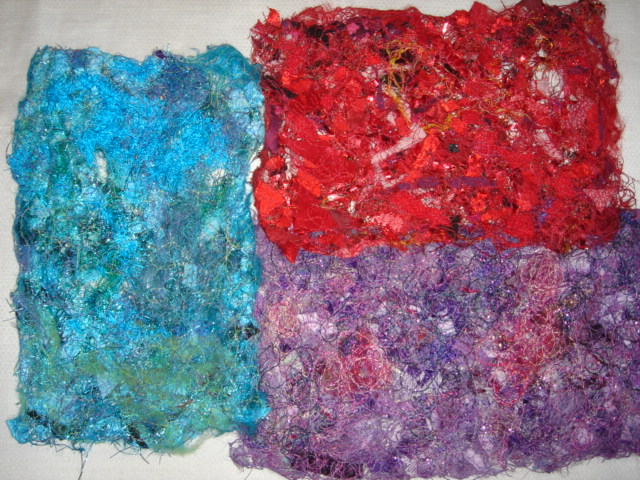
CONFETTI FABRIC TUTORIAL by Heathers3stars 
Lately I have been getting several questions on how I make my "
Confetti Fabric." This is fabric I make from a little bit of everything, and it makes a very unique and original piece of fiber art that can be framed as is (embellished or not) or cut up and used as applique pieces for special projects - there are so many uses for this, and it is so beautiful and fun that I just have to share my own technique for making it. I realize there are probably many other ways to go about making this - so experiment and have fun!!
The first step is to gather all the required materials, which is the most time-consuming part of this project, unless you already have your "Confetti" organized in drawers as I do. So clear off a table and a workspace, and start gathering!!
Materials Required:
A little note about materials: One of the BEST ways I have found to organize my studio and not waste *anything* is to have a big set of plastic drawers (shoe boxes would even work, with the ends cut off, anything where you can quickly "stuff" things) - where each drawer is designated to a color or set of colors. For example, my set is organized by Reds & Pinks, Blues & Aquas, Yellows & Oranges, Blacks & Grays, Whites and Purples. I only have 5 drawers, so I sort of divide my piles within the drawers as well. In each of these drawers I have thread snippets, little pieces of fabric from when I cut appliques, remnants of ribbons, loose beads, sequins, cut off pieces of fabric trims, trimmed edges off of other finished quilts...you get the idea. If I make a practice of saving these little bits, it makes me not ever waste these pieces - as soon as the drawer gets filled up, I simply make a piece of confetti fabric and begin stashing again!!

- I like to use Super Solvy Water Soluble Stabilizer, the kind that comes on a roll. Weight: Medium Color: Transparent Size: 7-7/8" x 9 yards (Item No. 405-08) (I like the transparent because it allows me to see the confetti underneath as I'm stitching.)
- Scissors
- Pins
- Choice of threads for Machine Stitching (you might prefer clear monofilament thread for a certain project, or I like to use Variegated threads, and several different shades, to highlight the areas of lights and darks in the confetti layer.)
- Sewing Machine with regular 90/14 needle (I like to use free motion type embroidery, so a free motion foot is optional - you can do this with straight lines as well.)
- Large kitchen sink that has a sprayer nozzle (or pouring from a cup would work fine)
- Large flat container at least the width of your piece (in my case, using the 7-7/8" wide Solvy, a 9" wide by 13" long glass dish worked very well)
- "Confetti" For this I use any combination of the following items - and get creative!!
- Recycled bits of fabric - from old finished projects trimmed edges, extra edges from cutting appliques, Unfinished objects, even ugly fabric that you hate the print of but has a good color can be cut up and used successfully in this project. Note - I sometimes find that ripped or intentionally frayed edges work better for a more cohesive final piece.
- Thread trash - as you are sewing and you snip threads from projects, don't throw them away! Keep a container by your machine to later take to your "Color Stash" drawers and sort out. This makes one of the BEST materials for the confetti fabric!!
- Cut up bits of Tulle
- Cut up bits of dyed or colored Cheesecloth
- Fabric Trims, especially Sequin Trims, add a huge burst of texture and color
- Yarns - any and all types!! Fuzzy Eyelash works well, and I especially love Boucle yarn in this project.
- Ribbons - Silk Ribbon, Satin, Jacquard - any will do - remnants, gift package bows, you name it!
- Vintage or new Seam Binding Tape
- Organza - cut up in pieces, or a long skinny length laid down in a curving, trailing like fashion
- Scrim - used the same as the organza
- Dyed Lace Pieces - can be especially effective
- Easter Grass!! (I used it in this green piece - it worked wonderfully!!)
- Silk flower petals, or other flower petals that won't dissolve in water
- Angelina Fibers - laid sparsely on top, adds a sparkliness to your project that is just amazing.
- Last but not least - ROVING - silk roving or wool roving, any kind of roving that will wet felt.
Materials I used:
Instructions:
- Decide what the color scheme of your piece will be. Do you want to make a piece of Confetti Fabric that is all one color? Will you make a piece that is half red and half pink? Will you make a piece that goes from light blue to medium blue to dark blue? Now is a good time to test out the color wheel! When I make my pieces, I try to include areas of lights and darks, no matter what my color scheme is, for example in this green piece I made I included some highlights of yellow and of dark blue. I think this makes the finished piece appear less "flat" and if you cut it up later for applique use, it makes the applique pieces come alive - (think about it as using a flat dyed piece of fabric vs. using a piece of overdyed batik!!)
- Gather your materials, set up your workspace, and set up your sewing machine.
 Cut two pieces of Solvy in a length you are comfortable working with - for me, any more than 16" was too long, because I don't have an extension table for my machine - and I just prefer to make this size at a time. I would recommend for your first attempt, make a piece that is 12" in length or smaller, just to get used to how the "confetti" might move around or how much you need to pin it, etc.
Lay the first piece of solvy down on a hard work surface (here I used black fabric for photos only - normally I would use a large self-healing mat, for ease of pinning in later steps). We will be making a "Sandwich" with two layers of Solvy, with the Confetti layers between them.
4.

Before you go crazy with the fun part, the Confetti, this "Roving step" is very important - gently pull apart some roving, and lay it down onto the first piece of Solvy. You can make it as thick or as thin as you'd like, but the bottom layer MUST consist of the roving. For my techinque, where everything gets "felted" together, this step is very important. I laid my roving down so that the lengths of roving went in opposide directions - from side-to-side AND up-and-down. (I suppose you could say so that the lengths go both vertically and horizontally, but that would be way too simple! ; )
5. Confetti Time!! In this step, you have my permission to get crazy!! Cut up things, shred them with your fingers, cut them with special edged scissors or decorative rotary blades, curve long pieces of yarn all around, have fun unravelling lengths of thread to just bunch up and smoosh down...this is the fun part!! Experiment with different textures and sizes of raw materials - see how a cut up piece of satin or velvet looks next to some shiny sequin trim...that's what makes your piece beautiful! I generally save the Angelina Fibers for the very last layer, for the sparkliness. A little goes a long way - just a few strands here and there add a lot of sparkle - I use it very sparingly. Also I generally don't put Angelina over the entire piece - only in sections, that way if I need a piece of the confetti fabric later and I don't want the sparkle, I have no problem. You can lay confetti down all the way out to the edges of the solvy, but I don't let anything hang off the edges because it will cause problems later with the stitching - you want all of your confetti to fit within the edges of the solvy. You can make this confetti very dense, or very sparse and "lace like" depending on what effect you want to end up with - you can even create shaped areas such as leaves or hearts or other shapes. As I am making a piece in this example for use as appliques later, I create mine pretty thick - I laid down the roving, sprinkled on bits of chopped up fabric, twirled around yarn pieces in meandering lines around the edges and in the center, chopped up more ribbon pieces and sprinkled them on, used some angelina, then added more yarn, threads, metallic sparkly threads, cheesecloth, silk ribbon...I just built up the layers so that I couldn't see any open gaps, but not so thick that it would be difficult to stitch later.
My finished "Confetti Layer"
6. Once you are pleased with your confetti layer, place the other cut piece of solvy on top of your confetti layer. This completes the "sandwich," so you have a bottom layer of solvy, a middle layer of confetti, and a top layer of solvy.
Here I am making the "Sandwich" - adding second layer of Solvy on top of confetti:
7. Pin the layers together. I pinned around the outside edges, to help hold everything in, and then randomly in the center. You might wish to pin yours all in one direction for ease of removing pins as you stitch.
Pinning the layers together:
8. Stitch the layers together. In my example, I used free motion embroidery. If you are not comfortable with free motion, you could simply sew in straight lines around the edges and back and forth across the middle, or make zig-zag lines, or a grid. I chose to use several different shades of variegated thread to stitch my layers together, however you might opt for clear monofilament thread or simply black - just remember, the stitching will add effect to the final piece. I stitch mine very densely, with lots and lots of tiny circles and swirling lines, because I use very small pieces of confetti, and I want them to all be connected together with my stitching so my piece doesn't fall apart once I remove the Solvy. In my example I used a brighter green to highlight brighter areas, and darker greens for darker areas of confetti. The rest I filled in with a medium green. Be creative! Try sparkly or metallic threads, even try contrasting color threads - they all create different effects.
Here I begin my free-motion stitching:
Here is my "sandwich" with all of the stitching completed:
9. Once the stitching is completed, take your piece to the kitchen sink. This is the exciting part!! I've propped up a large glass baking dish on the edges of the sink so I can easily fill and empty it repeatedly. A sprayer nozzle is especially handy - but if you don't have one you could also use a large plastic cup to gently pour water over the piece.
Fill dish with lukewarm water:
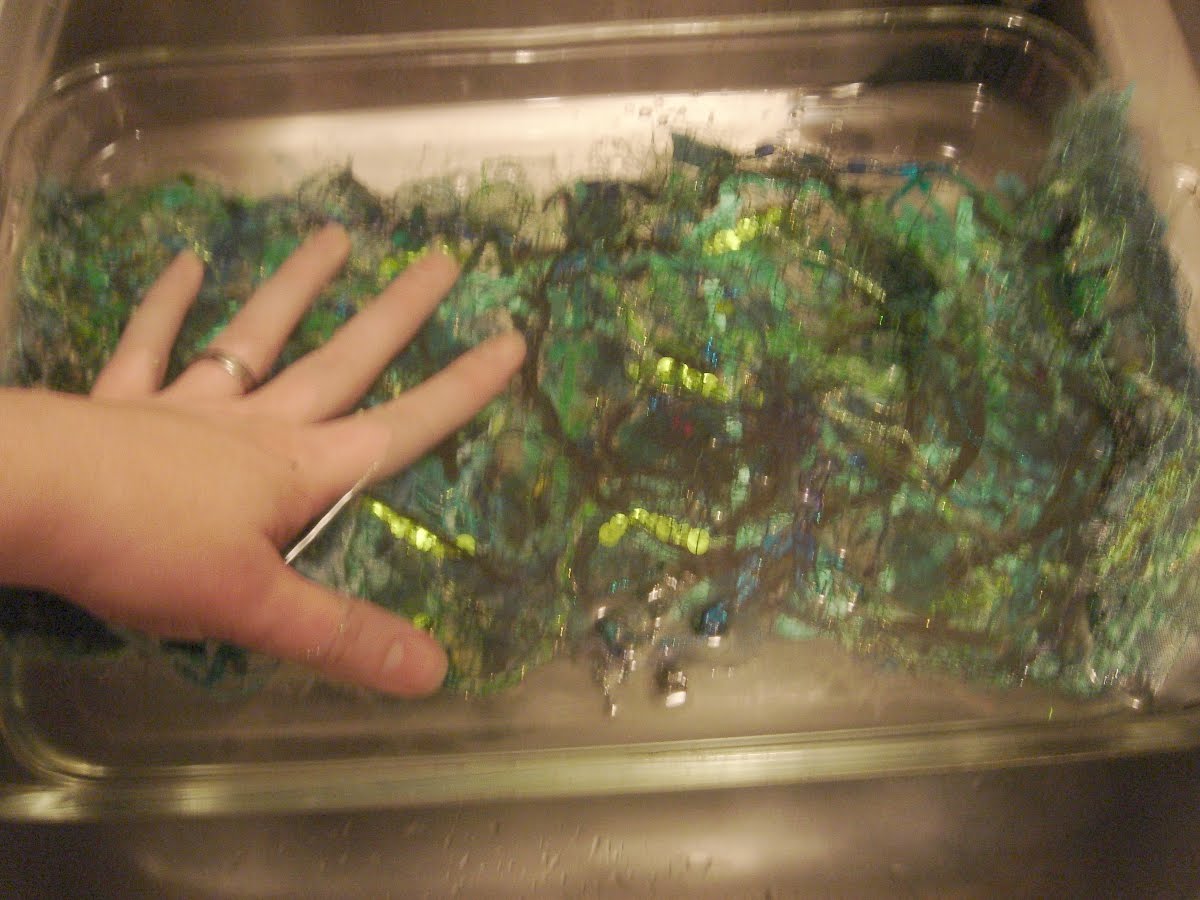
Here is how I like to rinse mine, in a way that helps the felting take place. I fill the dish with lukewarm water, and gently set my piece into the dish, squishing it down into the water so it is submerged.
Smoosh the sandwich into the water:
After it soaks for a couple of minutes, I use the sprayer nozzle and spray over the top surface of the piece, NOT on full blast - with medium to light water pressure. You'll see some bubbles as the solvy dissolves and mixes with the water - this is OK!
Lightly spraying the piece:
Then I empty the pan into the sink, and fill with lukewarm water again. Then, I swish the piece back and forth side to side in the pan, which makes sure that the roving sort of moves against itself in the water, which creates the felting. I just repeat this process, on both sides of the piece, until I feel the Solvy is completely washed out. This part is the most fun, because you get to see what your finished piece looks like!! : ) If there are any loose sequins or fibers or anything left in the dish, just throw them back into your color stash drawers for the next time : )
10. To dry, simply empty the dish of the water and let the piece dry right there - or if you're more impatient like me, you can roll it up in a thick towel and gently press the water out.
Rolling finished, washed out piece:
Often the back side of your piece will turn out just as interesting as the front! Because I begin mine with layers of roving, the back side of the piece has a very felted look with bits of the confetti poking through - I like this look as well and will at times use the backside instead of the front!
Photos of my finished "Confetti Fabric!" (Note - the sparklies from the sequins and Angelina fibers didn't show up as well in these photos - much more effective in person!!)
A closer view:
I'd love to see photos of "Confetti Fabric" or similar Solvy projects! : )
Enjoy the tutorial, and please let me know if you have any questions or if anything is unclear. Thank you!