May 31, 2010

Monet Waterlillies - Impressionistic Art Quilt

I found the loveliest little note card at Barnes & Noble, featuring Monet's Waterlillies. I have always loved Monet's work - especially his florals, which I had the great pleasure of seeing in person when my grandmother and I went to France...now about 16 years ago (!!) but I remember being in awe at the beautiful colors right in front of me.
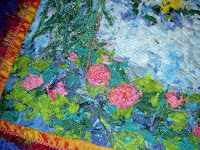
Since I learned this new "Impressionistic" technique, I decided to honor Monet with my own version of the Waterlillies painting I found on this notecard. Here are my results!


Here are a couple of close-up views of my favorite details - I find sometimes I love the zoomed in shots more than the quilts in their entirety!


~~ Enjoy! ~~


May 17, 2010

Scrappy Little Potholders

My mom requested potholders for Mother's Day, so I searched far and wide to find the perfect pattern for her. After MUCH searching, I found a neat potholder pattern in this magazine: "Sew It All" - Premiere Issue, (A Sew News Special Interest Publication). It is called "Hot Seat" by Beth Bradley, and the pattern can be found on the following links:
1. Front side pieces:  http://www.sewnews.com/content_downloads/TrivetPatternFront.pdf
2. Back side piece:  http://www.sewnews.com/content_downloads/TrivetPatternBack.pdf

Although the pattern requires a bit of finessing as far as construction, I like this one because it allowed me to use a variety of fabrics - I'm challenging myself to combine different batiks and colorful cotton prints in my recent projects. I love the "scrappy" look of the combined fabrics, and the shape of the finished piece. I opted for no loops (I don't hang mine anyway) but might do that next time, just so I can hang a couple for display in my kitchen.  Also, I used a lot of black overstitching and additional decorative stitching around the octagon in the center, because I like the feel that black stitching gives on colorful pieces of fabric. I dipped into a few of my "favorite stash" pieces of fabric, and love how they look combined together - it has me inspired to work on more scrappy, quilty things! : )


Front and back:

May 7, 2010

Tutorial - Confetti Fabric

CONFETTI FABRIC TUTORIAL by Heathers3stars
 

Lately I have been getting several questions on how I make my "Confetti Fabric." This is fabric I make from a little bit of everything, and it makes a very unique and original piece of fiber art that can be framed as is (embellished or not) or cut up and used as applique pieces for special projects - there are so many uses for this, and it is so beautiful and fun that I just have to share my own technique for making it. I realize there are probably many other ways to go about making this - so experiment and have fun!!


The first step is to gather all the required materials, which is the most time-consuming part of this project, unless you already have your "Confetti" organized in drawers as I do. So clear off a table and a workspace, and start gathering!!

Materials Required:

A little note about materials: One of the BEST ways I have found to organize my studio and not waste *anything* is to have a big set of plastic drawers (shoe boxes would even work, with the ends cut off, anything where you can quickly "stuff" things) - where each drawer is designated to a color or set of colors. For example, my set is organized by Reds & Pinks, Blues & Aquas, Yellows & Oranges, Blacks & Grays, Whites and Purples. I only have 5 drawers, so I sort of divide my piles within the drawers as well. In each of these drawers I have thread snippets, little pieces of fabric from when I cut appliques, remnants of ribbons, loose beads, sequins, cut off pieces of fabric trims, trimmed edges off of other finished quilts...you get the idea. If I make a practice of saving these little bits, it makes me not ever waste these pieces - as soon as the drawer gets filled up, I simply make a piece of confetti fabric and begin stashing again!!


  • I like to use Super Solvy Water Soluble Stabilizer, the kind that comes on a roll. Weight: Medium Color: Transparent Size: 7-7/8" x 9 yards (Item No. 405-08) (I like the transparent because it allows me to see the confetti underneath as I'm stitching.)
  • Scissors
  • Pins
  • Choice of threads for Machine Stitching (you might prefer clear monofilament thread for a certain project, or I like to use Variegated threads, and several different shades, to highlight the areas of lights and darks in the confetti layer.)
  • Sewing Machine with regular 90/14 needle (I like to use free motion type embroidery, so a free motion foot is optional - you can do this with straight lines as well.)
  • Large kitchen sink that has a sprayer nozzle (or pouring from a cup would work fine)
  • Large flat container at least the width of your piece (in my case, using the 7-7/8" wide Solvy, a 9" wide by 13" long glass dish worked very well)
  • "Confetti" For this I use any combination of the following items - and get creative!!
  • Recycled bits of fabric - from old finished projects trimmed edges, extra edges from cutting appliques, Unfinished objects, even ugly fabric that you hate the print of but has a good color can be cut up and used successfully in this project. Note - I sometimes find that ripped or intentionally frayed edges work better for a more cohesive final piece.
  • Thread trash - as you are sewing and you snip threads from projects, don't throw them away! Keep a container by your machine to later take to your "Color Stash" drawers and sort out. This makes one of the BEST materials for the confetti fabric!!
  • Cut up bits of Tulle
  • Cut up bits of dyed or colored Cheesecloth
  • Fabric Trims, especially Sequin Trims, add a huge burst of texture and color
  • Yarns - any and all types!! Fuzzy Eyelash works well, and I especially love Boucle yarn in this project.
  • Ribbons - Silk Ribbon, Satin, Jacquard - any will do - remnants, gift package bows, you name it!
  • Vintage or new Seam Binding Tape
  • Organza - cut up in pieces, or a long skinny length laid down in a curving, trailing like fashion
  • Scrim - used the same as the organza
  • Dyed Lace Pieces - can be especially effective
  • Easter Grass!! (I used it in this green piece - it worked wonderfully!!)
  • Silk flower petals, or other flower petals that won't dissolve in water
  • Angelina Fibers - laid sparsely on top, adds a sparkliness to your project that is just amazing.

  • Last but not least - ROVING - silk roving or wool roving, any kind of roving that will wet felt.


Materials I used:


Instructions:

  1. Decide what the color scheme of your piece will be. Do you want to make a piece of Confetti Fabric that is all one color? Will you make a piece that is half red and half pink? Will you make a piece that goes from light blue to medium blue to dark blue? Now is a good time to test out the color wheel! When I make my pieces, I try to include areas of lights and darks, no matter what my color scheme is, for example in this green piece I made I included some highlights of yellow and of dark blue. I think this makes the finished piece appear less "flat" and if you cut it up later for applique use, it makes the applique pieces come alive - (think about it as using a flat dyed piece of fabric vs. using a piece of overdyed batik!!)
  2. Gather your materials, set up your workspace, and set up your sewing machine.
  3. Cut two pieces of Solvy in a length you are comfortable working with - for me, any more than 16" was too long, because I don't have an extension table for my machine - and I just prefer to make this size at a time. I would recommend for your first attempt, make a piece that is 12" in length or smaller, just to get used to how the "confetti" might move around or how much you need to pin it, etc.

Lay the first piece of solvy down on a hard work surface (here I used black fabric for photos only - normally I would use a large self-healing mat, for ease of pinning in later steps). We will be making a "Sandwich" with two layers of Solvy, with the Confetti layers between them.


4.  Before you go crazy with the fun part, the Confetti, this "Roving step" is very important - gently pull apart some roving, and lay it down onto the first piece of Solvy. You can make it as thick or as thin as you'd like, but the bottom layer MUST consist of the roving. For my techinque, where everything gets "felted" together, this step is very important. I laid my roving down so that the lengths of roving went in opposide directions - from side-to-side AND up-and-down. (I suppose you could say so that the lengths go both vertically and horizontally, but that would be way too simple! ; )


5.  Confetti Time!! In this step, you have my permission to get crazy!! Cut up things, shred them with your fingers, cut them with special edged scissors or decorative rotary blades, curve long pieces of yarn all around, have fun unravelling lengths of thread to just bunch up and smoosh down...this is the fun part!! Experiment with different textures and sizes of raw materials - see how a cut up piece of satin or velvet looks next to some shiny sequin trim...that's what makes your piece beautiful! I generally save the Angelina Fibers for the very last layer, for the sparkliness. A little goes a long way - just a few strands here and there add a lot of sparkle - I use it very sparingly. Also I generally don't put Angelina over the entire piece - only in sections, that way if I need a piece of the confetti fabric later and I don't want the sparkle, I have no problem. You can lay confetti down all the way out to the edges of the solvy, but I don't let anything hang off the edges because it will cause problems later with the stitching - you want all of your confetti to fit within the edges of the solvy. You can make this confetti very dense, or very sparse and "lace like" depending on what effect you want to end up with - you can even create shaped areas such as leaves or hearts or other shapes. As I am making a piece in this example for use as appliques later, I create mine pretty thick - I laid down the roving, sprinkled on bits of chopped up fabric, twirled around yarn pieces in meandering lines around the edges and in the center, chopped up more ribbon pieces and sprinkled them on, used some angelina, then added more yarn, threads, metallic sparkly threads, cheesecloth, silk ribbon...I just built up the layers so that I couldn't see any open gaps, but not so thick that it would be difficult to stitch later.

My finished "Confetti Layer"


6.  Once you are pleased with your confetti layer, place the other cut piece of solvy on top of your confetti layer. This completes the "sandwich," so you have a bottom layer of solvy, a middle layer of confetti, and a top layer of solvy.
Here I am making the "Sandwich" - adding second layer of Solvy on top of confetti:


7.  Pin the layers together. I pinned around the outside edges, to help hold everything in, and then randomly in the center. You might wish to pin yours all in one direction for ease of removing pins as you stitch.

Pinning the layers together:


8.  Stitch the layers together. In my example, I used free motion embroidery. If you are not comfortable with free motion, you could simply sew in straight lines around the edges and back and forth across the middle, or make zig-zag lines, or a grid. I chose to use several different shades of variegated thread to stitch my layers together, however you might opt for clear monofilament thread or simply black - just remember, the stitching will add effect to the final piece. I stitch mine very densely, with lots and lots of tiny circles and swirling lines, because I use very small pieces of confetti, and I want them to all be connected together with my stitching so my piece doesn't fall apart once I remove the Solvy. In my example I used a brighter green to highlight brighter areas, and darker greens for darker areas of confetti. The rest I filled in with a medium green. Be creative! Try sparkly or metallic threads, even try contrasting color threads - they all create different effects.

Here I begin my free-motion stitching:


Here is my "sandwich" with all of the stitching completed:


9.  Once the stitching is completed, take your piece to the kitchen sink. This is the exciting part!! I've propped up a large glass baking dish on the edges of the sink so I can easily fill and empty it repeatedly. A sprayer nozzle is especially handy - but if you don't have one you could also use a large plastic cup to gently pour water over the piece.
Fill dish with lukewarm water:


Here is how I like to rinse mine, in a way that helps the felting take place. I fill the dish with lukewarm water, and gently set my piece into the dish, squishing it down into the water so it is submerged.

Smoosh the sandwich into the water:


After it soaks for a couple of minutes, I use the sprayer nozzle and spray over the top surface of the piece, NOT on full blast - with medium to light water pressure. You'll see some bubbles as the solvy dissolves and mixes with the water - this is OK!

Lightly spraying the piece:


Then I empty the pan into the sink, and fill with lukewarm water again. Then, I swish the piece back and forth side to side in the pan, which makes sure that the roving sort of moves against itself in the water, which creates the felting. I just repeat this process, on both sides of the piece, until I feel the Solvy is completely washed out. This part is the most fun, because you get to see what your finished piece looks like!! : ) If there are any loose sequins or fibers or anything left in the dish, just throw them back into your color stash drawers for the next time : )

10.  To dry, simply empty the dish of the water and let the piece dry right there - or if you're more impatient like me, you can roll it up in a thick towel and gently press the water out.

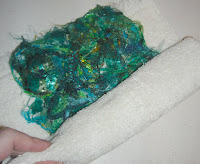
Rolling finished, washed out piece:


Often the back side of your piece will turn out just as interesting as the front! Because I begin mine with layers of roving, the back side of the piece has a very felted look with bits of the confetti poking through - I like this look as well and will at times use the backside instead of the front!


Photos of my finished "Confetti Fabric!" (Note - the sparklies from the sequins and Angelina fibers didn't show up as well in these photos - much more effective in person!!)


A closer view:


I'd love to see photos of "Confetti Fabric" or similar Solvy projects! : )

Enjoy the tutorial, and please let me know if you have any questions or if anything is unclear. Thank you!


May 5, 2010

Photos of Tulip Time

Ok - so before I go and have my own little messy paint celebration party, I wanted to just post a few photos!  After taking photos of tulips all day at our annual Tulip Time in downtown Holland, MI, I couldn't wait to see what kind of shots I ended up with!

When every single street corner in all of downtown and beyond looks like this, it is difficult to pick and choose which flowers to photograph!!


BUT - somehow I managed to pick out a few favorites from the masses...except I forgot to turn up the resolution on my camera, so I will be going back again to retake some of my favorites.

For now, here are some of my favorite shots:


In this last one, I asked Jason to hold the flower for me so I could get a better view of the center, without hurting the flower - but I actually liked his hand in the shot - very sweet : )
(shhhh, don't tell him it's on here!)

Today is a GOOD day!

Today has been a WONDERFUL day - for so many reasons!!

1. It is my middle daughter's (Bryanne's) 10th birthday today - double digits!! (I'm thinking of making a Cinqo de Mayo style art quilt just for her, especially since her favorite colors are orange and yellow...)

2. I got to take the afternoon and stroll around downtown with Jason, and we visited all around downtown during Tulip Time - we had amazing Chicken Fajita Gyros and took tons of photos of Tulips, enjoyed some Dutch Dancing in the streets, listened to several live musicians performing on the streets, and got to stroll leisurely through all of the downtown art galleries - my idea of a *perfect* day!

3. While we were downtown, we saw the Tulip Time quilt show, where one of my art quilts was on display - I was a little disappointed about the placement of my quilt (next to a window with barely any wall space) but that's OK, I was still accepted and it was my first art quilt in a gallery setting - so I still felt proud : ) I got to see a lot of other really beautiful quilts there, including traditional style, art quilt style, and a really neat one that inspired me - it was a 50th Anniversary Quilt made my the children and grandchildren, and included lots of photos printed onto fabric and arranged between traditionally quilted blocks and fabric that had personal messages written all over it - you could tell it was a true labor of love, and just amazing...I could only imagine receiving such a treasure on a 50th wedding anniversary from my entire family - wow!

4. Last but not least, when I got home today, I immediately turned on the computer to check Pokey's (Patricia Bolton, from Quilting Arts) blog - which listed the finalists for the "How Entertaining!" art quilt challenge.  There were only 13 finalists listed on her blog, and I was delighted to find my name among them!! This is SOOOO completely exciting - I was literally jumping up and down!! Now not only do I get to give an art quilt loaded with personal meaning to my grandmother for her 80th birthday, I can also tell her it was PUBLISHED, and that the entire world gets to see how her love and the values she has cultivated in our family inspired my gift to her. I'm excited and happy beyond words!!!! : )


This is the quilt I submitted for this challenge:


Here is a more detailed blog entry about this art quilt:


Thank you so much Pokey, and everyone at Quilting Arts, for choosing my quilt!!

~~~~~~~~~~~~

Tonight is a night for opening up the windows to the warm spring night,
turning on a little music, and creating with messy paint to my heart's content.
CELEBRATION TIME!!!!!!!

Can one single day possibly get ANY better than THIS??? : )

May 4, 2010

Tulip Time Quilt Show - My Entry!

Here in Holland, MI, we have an annual "Tulip Time" celebration of Dutch heritage and culture, which includes parades, Dutch Dancing, concerts, theatre, Dutch attractions, Dutch Food, children's events, a carnival, trolley tours, and last but not least to me - wonderful art on display! It is always held in the beginning of May, when the tulips - which are planted everywhere!! - are at full bloom. It is absolutely beautiful and festive, lively and inspiring. (Here is the official link to the Tulip Time Festival website: http://www.tuliptime.com/)

This year, I entered an art quilt into the Quilt Show portion of the festival - and it was accepted!!
I was very fortunate to be granted a "VIP Exhibitor Pass" and will visit this week and see if I may take some photographs of my quilt on display! : ) But for now, I'll just post a quick photo of the quilt I chose, which I've already previously blogged (Impressionistic Style Art Quilt).

I'm very excited about visiting the show, and seeing the other local talent - and perhaps get a little inspiration for next year's entry! I plan to take lots of photos downtown to share on my blog, and I'm planning on taking lots of photos of Tulips - which I'll digitally alter and print out for layers of my future quilts. There will be more to share again soon! : )

May 2, 2010

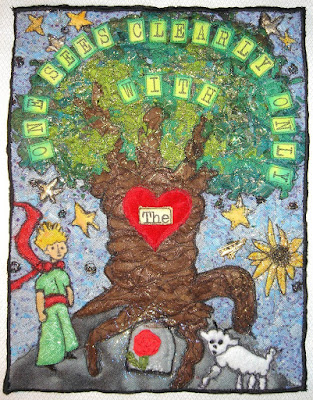
Quilting Arts Challenge "How Entertaining!" - The Little Prince

"One sees clearly only with the heart."

Quilting Arts announced a challenge in their February/March 2010 issue called "How Entertaining!"
Because my grandmother's 80th birthday is coming up, I decided to combine this challenge with a gift for her. She introduced me to my favorite book when I was very young, and gave me my own special copy on my 11th birthday, along with a French version (which inside held a paper bill from France which features artwork based on the book!) which I still have - it is among my most treasured posessions. The book is called "The Little Prince" and is a children's book filled with adult messages. (Here is a link to the book:  The Little Prince on Amazon) There are SO MANY lessons and truths in this one little book - it is so wonderfully written, and just absolutely amazing. I encourage anyone and everyone to read it!! At least once ; )


I chose this book as my inspiration because of the personal meaning as well as the many fun characters and elements in the book that would translate well to an art quilt. I was a bit limited by the size of the quilt which could only be 8.5" x 11" (and had to have vertical orientation) - but I managed to include most of my favorite elements of the book. The quote I chose, which reads "One sees clearly only with the heart" is one of the many, many morales tucked inside this little 96-page children's book - but one of my favorites, and the one I wanted to show grandmother that it had made a big impression on me. (That quote is immediately followed in the book by "Anything essential is invisible to the eyes.")

Without giving away *too* much of the story - I just want to give a brief overview of the book, to help explain the style I chose for the art quilt:

In the book, there is a "Little Prince" who cares for a beautiful flower on his tiny planet way far away. He leaves her to explore the world, and on his many travels meets several characters which signify some futile aspect of adult existence - clearly showing readers the absurdity of adulthood through a child's eyes. He meets a pilot who has crashed in the desert (the narrator voice in this story) and immediately asks him to make him a drawing, although the pilot had given up drawing when he was a child. Back then, he had drawn a picture of a boa constrictor swallowing an elephant, which on the surface, appeared to the majority of people as simply a "hat." From that point on, the pilot had used this single drawing to "judge" people on whether to talk about inconsequential things or "things that matter." (I love that part of the book - you know how you can talk to some people about art stuff and they just "get it?" - with others you talk about the weather!!)  The Little Prince immediately recognized the pilot's drawing as a boa constrictor swallowing an elephant, much to the pilot's surprise, and from there, their relationship progresses throughout the rest of the book as the little prince reveals to the pilot little by little his circumstances and life lessons.

Because of the references in the book about the pilot having limited drawing ability (as I myself do!) I wanted to create the elements in this quilt to look hand-drawn by an unexperienced artist.  Especially the sheep, because it was the very first thing that the Little Prince demanded of the pilot to draw for him - which was his first drawing since childhood.  I chose to use heavy black outlining on the figures to give a more "illustrated" sort of "cartoon" appearance.

The background of this quilt is created using tiny little bits of chopped up fabric, basically the "Impressionistic Art Quilt" style I have been experimenting with lately. This is the first time I've used this style in conjunction with elements besides landscape features, but I definitely enjoyed the challenge!!
My work on this quilt was divided up into a few different "phases" or stages of work, only after many drawings and additional readings of the book, several lists, time spent reminiscing about the portions of the book my grandmother had emphasized the meaning of...until I finally had a rough sketch of the quilt and a chosen quote. (It was very difficult for me to choose just one!!)

In "Phase 1," I used several different fabrics to create the background (sky with stars, tree trunk and leaves), all chopped up into tiny pieces and carefully arranged, then placed at the bottom a rounded piece of overdyed gray felt for the ground surface to resemble the gray ground on the Little Prince's planet (as depicted in the illustrations in the book). Then I created the figures: the little prince by drawing him on fabric and cutting out the individual pieces (head, clothing, arms, feet, belt, scarf), the sheep by freehand cutting a piece of white cushy felt, the glass dome for the flower freehand cut out of ivory-colored organza. The stars were also cut from different fabrics and placed in this phase. To finish the background, I placed some strands of Angelina fibers to add some sparkle and make the piece come alive - green Angelina fibers in the foliage makes it look like a fairy-tale scene, sparkling and illuminated with color...

In "Phase 2" I covered all of this with fine black tulle, then stitched using clear monofilament thread with free motion embroidery all over. I carefully cut away some of the tulle after the piece had been free motion embroidered, for elements such as the flower's glass dome, the sheep, the Little Prince's face, and a few of the stars. Then I added in details such as facial features with a fine-point sharpie marker for the Little Prince, black cotton floss for the sheep's face, and ribbon embroidery "Spider Web Rose" for the flower.
At this point I also did some additional free-motion embroidery (more green on the foliage, black to outline the figures, yellow to highlight the stars) and some hand-stitching in places.

In "Phase 3," I dyed pre-printed block letters on canvas, using in two-tone green color-scheme to help them blend into the background (but not *too* much), so they could be used as "leaves." I wanted the heart to be the main focal point of the quilt because of it's significance in the quote, as well as the meaning behind the whole story (and my own love for my grandmother), so I appliqued it on top of the rest of the quilt to allow it to pop forward. Last, I added a little gold charm of an airplane in the sky - as I went through my "embellishment" collection (which is entirely too huge!!) I stumbled upon these airplane charms, and who knows where else I would ever use one of them!! I cut the loop off with wire-cutters, and stitched it onto the quilt using clear monofilament thread (doubled for strength).

At this point, to me, it felt "complete" (something I don't always feel about art quilts especially, as I usually want to add more and more and keep on stitching and beading and adding things...). I chose to finish this quilt with a narrow satin stitch in black, because I wanted something simple, and easy, and quite frankly, because I dread having to bind quilts!! As it turned out, it *still* took me about 3 hours just to complete the satin stitching around the edges, so maybe next time I'll rethink that plan... ; )  Last but not least, I made a hanging sleeve and label for the back. I'll post a photo of the finished label at the end of this post, because it also holds a personal message for my grandmother : )

I've titled this quilt "With the Heart."


Now some detail shots:


I feel as if there is so much more I could explain about the book, the storyline, the characters, the lessons I have gleaned from this book - and how and why I created this quilt - I guess that is the feeling you get when a project "hits home" and you want to share it with the world. I hope the meaning behind the quilt translates well to the viewers, and that they too, see it with their hearts. I know that my grandmother will : )

More things that make me happy!

You know that Silk Sari Ribbon that I keep talking about? I *really* do love it!!
Here is a little peek at the window in my art room - I like to iron out the pieces of ribbon and hang them on the blinds (they were white and boring anyway!) - then I can just reach and grab them anytime I please!
I love having a rainbow of color in the window...some people might think of it as being "messy" but I believe it is pure inspiration! It's especially beautiful when the light shines through the window - the ribbon becomes just illuminated with color.